- 1. Key Clauses on NDT in ASTM A53
- 2. What Ultrasonic Testing (UT) Can Do
- 3. Typical UT Execution Steps and Quality Control Points Required by ASTM A53
- 4. Comparison with Other NDT Methods
- 5. Why Buyers Should Include UT in Their “Must-Ask Checklist”
- 6. LONGMA’s Commitment — How We Turn “Standards” into Customer Safety Assurance
- 7. Conclusion
For welded steel pipes under the ASTM A53 standard, Ultrasonic Testing (UT) is not just an “optional item”; in many cases, it is a critical measure to ensure weld integrity, meet specification acceptance criteria, and mitigate procurement and operational risks. ASTM A53 explicitly designates “non-destructive electrical testing (including ultrasonic/electromagnetic/eddy current testing)” as an inspection method for Electric Resistance Welded (ERW)/welded pipe welds, and specifies detailed requirements for calibration, verification, and acceptance criteria.
Key Clauses on NDT in ASTM A53
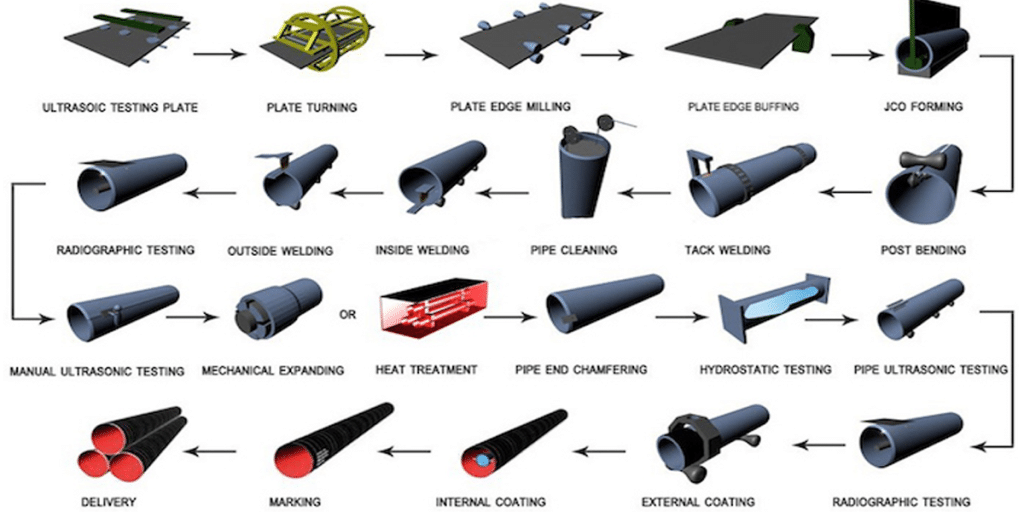
Section 9 of ASTM A53 stipulates that “non-destructive electrical testing” shall be performed on welds of Type E / Type F Grade B (for pipes with NPS 2 and larger), and clearly states that this testing can be conducted in accordance with practices such as E213, E273, or E570. The standard also requires the use of ultrasonic/electromagnetic equipment capable of continuous, uninterrupted weld inspection, and defines reference standards, verification frequency, and other related requirements.
What Ultrasonic Testing (UT) Can Do
- Primary Purpose: Detect defects in welds and the heat-affected zone (HAZ) adjacent to welds, such as lack of fusion/penetration, longitudinal cracks, slag inclusions, gas pores, and laminations; and provide quantitative data on “effective wall thickness” loss.
- Advantages: Enables continuous (full-circumferential or spiral) scanning along welds; high sensitivity to planar cracks (especially longitudinal ones); no ionizing radiation risk; can be automated on production lines with electronic records retained for traceability and quality certification.
Typical UT Execution Steps and Quality Control Points Required by ASTM A53
- Workpiece Surface Preparation and Couplant Application: Clean and grind the surface, then apply couplant (to ensure sound energy transmission).
- Reference Standards and Calibration: In accordance with ASTM A53 requirements, prepare reference blocks (simulating internal and external surface defects) with the same diameter/wall thickness as the test piece, and calibrate the equipment as specified (ASTM A53 §9.1.3).
- Equipment and Procedure Verification: The equipment shall be verified at least “once per work shift or at intervals not exceeding 8 hours” to confirm its effectiveness (ASTM A53 §9.1.2).
- Scanning Methods and Documentation: Select pulse-echo, phased array, or immersion techniques in compliance with E213/E273; record scanning parameters and inspection results (E213 emphasizes the elements of reporting and documentation).
- Judgment and Remediation: Determine the presence of defects based on ASTM A53 acceptance criteria (refer to the standard table); if signals exceed the acceptance limits, handle the issue in accordance with the standard or provide evidence that the effective wall thickness is not reduced.
Comparison with Other NDT Methods
| Method | Primary Inspection Targets | Advantages | Limitations / Specifications |
| Ultrasonic Testing (UT) | Internal weld defects, wall thickness | Full-volume inspection / high sensitivity, no radiation, easy automation | Requires good coupling and calibration; compliant with E213/E273. |
| Eddy Current / Electromagnetic Testing (ET) | Surface and near-surface defects | High speed, suitable for thin-walled/continuous inspection | Sensitive to material magnetism/geometry; compliant with E309. |
| Magnetic Flux Leakage (MFL) | Longitudinal cross-sectional defects, circumferential defects | Enables rapid full-circumferential inspection | Primarily for ferromagnetic materials; compliant with Practice E570. |
| Radiographic Testing (RT) | Internal volumetric defects (e.g., pores, voids) | Intuitive images, clear defect morphology | Ionizing radiation risk, on-site restrictions; refer to E1032/ASME V. |
Why Buyers Should Include UT in Their “Must-Ask Checklist”
- Extremely High Risk Cost of Hidden Defects: The costs of conveyed medium leakage, production shutdown for maintenance, and fines for reputation or environmental damage far exceed the cost of testing. ASTM A53’s NDE (Non-Destructive Examination) requirements aim to control such risks within manageable limits.
- Traceability and Contract Compliance: Adopting ASTM A53-specified practices (E213/E273, etc.) and retaining inspection records/calibration reports significantly enhances a supplier’s credibility during bidding and acceptance.
- Regulations and Industry Trends: Recent regulations and adoptions (e.g., references to ASTM A53/A53M-22 in certain pipeline safety documents) indicate a growing focus on standardized NDT. Buyers should carefully select manufacturers with compliant inspection capabilities.
LONGMA’s Commitment — How We Turn “Standards” into Customer Safety Assurance
As a pipe manufacturer with over 20 years of industry experience, LONGMA implements ASTM A53’s NDT requirements thoroughly in production and factory inspection:
- We are equipped with an in-house NDT laboratory, using reference blocks with the same diameter/wall thickness as the test pieces for UT calibration and on-line verification; equipment and procedures are executed in accordance with ASTM E213 / E273.
- Our in-house inspectors have completed ISO/ASNT-accredited system training and certification (detailed reports can be provided for technical qualifications, record retention, and inspection procedures), and the factory inspection report clearly marks NDE results with the notation “(NDE)” (in compliance with ASTM A53 requirements).
- We provide customers with complete documentation: full Material Test Certificate (MTC), NDT reports, reference block specifications, and calibration records — replacing slogans with data and evidence to mitigate customer risks during acceptance and quality assurance.
Conclusion
If you need welded steel pipes compliant with ASTM A53 and aim to minimize project risks, you must make Ultrasonic Testing (and relevant NDT practices specified in ASTM A53) a mandatory requirement for procurement and acceptance. LONGMA not only understands the standard provisions but also upholds “in-house laboratory + procedure execution + traceable reporting” as a commitment to customers. Want to view samples of specific inspection reports, reference block dimensions, or request a customized inspection explanation for your purchase order? Please share your project specifications (diameter, wall thickness, application, and acceptance standards) with us, and LONGMA will provide a tailored inspection and quotation plan.
Key References / Basis (Excerpts)
ASTM A53/A53M (§9.1–9.2, Reference Standards E213/E273/E309/E570)
